| HOME SEW CRAFTS DECOR SHOP |
|
CRAZY QUILT
hot pad or quilt block |
| lessons holiday patterns sewing patterns |

|
-> home decor -> Kitchen
What Is Crazy Quilting?
Hot Pad, Pot Holder or Quilt Blockfinished block measures 8.5" x 8.5" Crazy quilting is a great way to use up scraps. It consists of stitching odd shaped pieces to one another using a muslin or cotton base fabric. There are several methods for crazy quilting. This is the method that I use. Check out our Flip & Sew Fabric Art for a similar method of sewing. All patterns, images and text © Christina Sherrod of CraftAndFabricLinks.com unless otherwise noted. |
Item Size - finished block or hot pad8.5" x 8.5" |
Insulation & Heat Reistant FabricThis project uses Insul-Bright and Therma Flec. These materials provide insulation and heat resistance. Visit my Amazon store page to purchase fusible fleece, insul-bright, heat resistant cloth, quilting pins, and other items I use in my projects. |
Supplies4-5 strips of fabric, each measuring approximately 4" x 12" 1 8.5" x 8.5" square of white cotton fabric (or muslin) for crazy quilt base Blendable thread or decorative thread for machine embroidery (or hand embroidery threads) Various embellishments such as yarn, lace, buttons, ribbon, etc. Supplies for Hot Pad or Pot Holder: 1 8.5" x 8.5" square of "insul-bright" hot pad insulation (see above information on insulation fabric) binding: approximately 40" of 1.5" wide fabric(longer if you are adding a hanging loop) 1 8.5" x 8.5" square of backing fabric or "Therma Flec" heat resistant cloth (silver fabric to use on side that comes into contact with hot surface) 2 squares of 8.5" x 8.5" cotton batting PRE-WASH AND DRY YOUR FABRIC BEFORE BEGINNING |
Instructionsuse 1/4" seam allowanceIron between each step. Read through all directions completely before beginning.
|
|
|
|
|
|
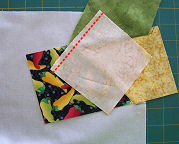
Press seams open. Trim seam alowance to 1/4". Repeat until the entire muslin square is covered. Refer to images below.
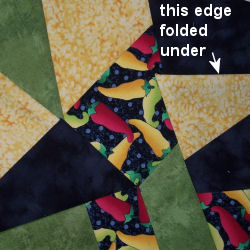
HINTS: Press between each step. Trim seams between each piece. If you have a piece that contains an edge that will not be sewn into a seam, fold it under before stitching it into place. This way, it will not contain a raw edge. Refer to image below left. If you have a long edge to connect to, stitch a few pieces together and then attach them as one piece. Refer to image below right. |
|
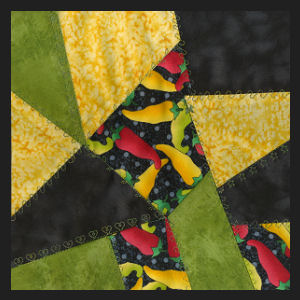
The finished, trimmed block is shown in the following photo. Several pieces have raw edges that are folded under. Other areas were sewn as a connected group of pieces. |
|
Refer to Basket Hot Pad for instructions on finishing your hot pad or pot holder. Refer to Assemble And Bind A Quilt for instructions on binding, layering and backing a quilt. |
Related Project
Quick & Easy! Protect your table with these easy-to-make trivets. |
Quick Reference |
Learn To Paint!free video tutorialsVisit my youtube channel. Free videos with step by step instructions. Paint beautiful paintings for your home. |
Please ShareI rely on advertising to keep my site free. Please share with friends. |
Privacy Policy & Terms Of UseBy using our website, you expressly consent to our Privacy Policy and Terms & Conditions. All Patterns, images and instructions are copyright protected. |

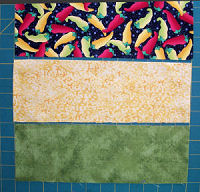 1. Lay out all strips of fabric (image on right shows 3 of the 4 strips that I used)
 2. Place the fabric strips in a stack and make three straight cuts at random angles.
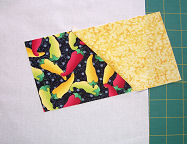
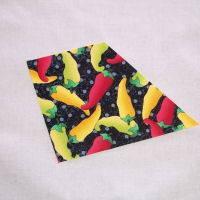 3. Place one fabric piece in the center of the muslin square.
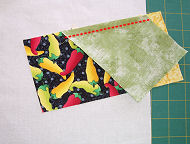
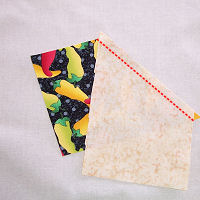 4. Place second fabric piece right sides together over first piece, aligning one edge. If you prefer, you can lay the second piece at a random angle, but be sure that when you stitch them together you will totally enclose one side of the first piece. In other words, don't leave muslin showing between sewn pieces.
 When the muslin piece is totally covered, turn to back side of block and trim off all edges. The block should measure 12.5" x 12.5". Baste around the outer edge of the block, 1/8" from the edge, to secure raw edges.
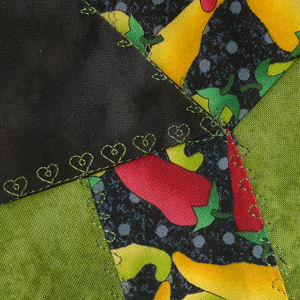 Embellish!
 Table Trivets