|
|
| HOME SEW CRAFTS DECOR SHOP |
|
SEMINOLE QUILTED EYEGLASS CASES
|
| lessons holiday patterns sewing patterns |

|
-> sewing patterns -> accessories
|
beautifully finished inside & out
|
|
page 1 of 2
|
A word from the designer
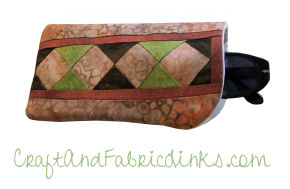
The seminole quilted eyeglass case in my original design first appeared on this website many years ago. People loved it, but glasses tended to slip out of the case. I created a new design that includes a small pouch at the top of the case on the inside, back side. That solves the problem without the need for adding buttons or closures. I also changed the construction so that assembly is easier. I love it!
|
Supplies
Pattern*: Rounded Corner Template *Our pattern downloads as a pdf file. If you need instructions on using pdf files, go to PDF Instructions. |
PRE-WASH, DRY, & PRESS FABRIC BEFORE USINGIf you plan to wash your glasses case in the future you will need to pre-shrink the fabric before using. Cotton fabrics (such as quilt fabric) shrink; pre-wash, dry and press before using.
|
DIRECTIONSNote: all seams are 1/4 inch. Always iron between steps.
Sewing Supplies: thread, scissors, quilting pins, large sewing ruler, seam ripper |
Create Diamond PieceLay out three long strips of fabric, with the narrow one in the middle (i.e. the strip measuring 1.75" wide is in the middle). Sew the three strips together, right sides together. Press seams away from center strip. Trim ends straight, using sewing ruler or quilter's square. |
|
Lay stitched piece so that the strips are vertical. |
|
|
|
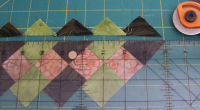
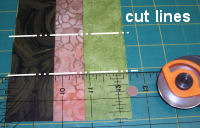
Sew the strips together right sides together. Trim off points. Use a sewing ruler and rotary cutter for best results. Cut off ends, leaving 4 "diamonds" plus 1/4" all the way around. See photos below. Your diamond piece should measure approzimately 2" x 7". Don't worry if your piece is not this exact size, however. Other pieces will be added and the entire piece will be trimmed to a final size later. If you need help with points, go to: Quilt Lessons: Points. |


|
|
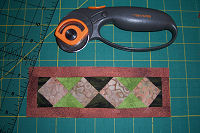
Measure across the width of the diamond strip; it should measure approximately 2". Cut two pieces of border fabric 1" x 2" (or the width you need). Stitch a brown strip to each end of the diamond strip. Press seams toward outer edge. Cut two pieces of border fabric 1" x 7.5" and stitch them to the two long sides of the diamond strip. Press seams toward outer edge. |
|
|
Quick Reference |
Learn To Paint!free video tutorialsVisit my youtube channel. Free videos with step by step instructions. Paint beautiful paintings for your home. |
Please ShareI rely on advertising to keep my site free. Please share with friends. |
Privacy Policy & Terms Of UseBy using our website, you expressly consent to our Privacy Policy and Terms & Conditions. All Patterns, images and instructions are copyright protected. |


 Cut the following fabric pieces: (choose your own colors - I will refer to colors shown for this project)
 Cut the piece into 1.75" wide strips. You should have a 10 strips. This is more than you will need, but allows for "errors".
 Next, take your 7 best strips of each set and lay them out diagonally, next to each other. Rotate which row
is on top (i.e. if dark green is on top for one strip, the one adjacent should have light green on top).
 Trim the bordered diamond strip so that its finished size is 2.5" x 7.5".
