|
|
|
|
| HOME SEW CRAFTS DECOR SHOP |
|
PURSE PATTERN Page 4
Purse Top Zipper |
| lessons holiday patterns sewing patterns |

|
-> sewing patterns -> accessories
|
Page 4: top zipper |
DIRECTIONSNOTE: All seams 1/4" |
Create Purse Top Zipper Piece
The top zipper with casings and end tab will be attached to the lining, BEFORE the lining sides are stitched together. The zipper piece will be stitched to the RIGHT side of the lining. One zipper side will be stitched to the front of the bag (inside lining), and one side will be stitched to the back of the bag (inside lining). It sounds complicated, but it is not difficult. 1. Create End Tab & Casings For ZipperYour purse zipper should be at least 1.5" longer than the purse top. This purse has a side length of 10"; therefore the zipper should be at least 11.5". I purchased a 12" zipper, which was fine because zippers can be trimmed to fit. End Tab: A width of about 1.5" is perfect for the opening at the top of the purse. My zipper was already almost 1.5" wide. The finished end tab should be the width of the zipper and about 1" long. Measure your zipper width. Add 1/2" for seam allowances. Cut a piece of purse fabric 2.5" long x the width you need for your zipper. My piece was 2" x 2.5". Press under the long edges. Then fold the the tab right sides together (across width). Stitch the sides. Leave the pressed edges unstitched. Trim the corners. Turn right side out. |
|
|
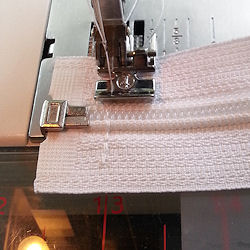 Prepare Zipper: Close the zipper (or zip it part way up). Stitch across the closed end of the zipper, near the metal end piece.
|
|
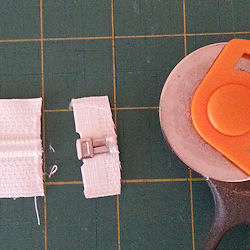 Trim off the metal end piece.
|
|
 Slip the zipper tab over the end of the zipper (the cut end). Stitch in place, stitching the sides and end near zipper.
|
Press under each short end 1/4". Press the casing in half, wrong sides together, lengthwise. Press the two sides toward the center so that the unfinished edges meet in the center. The pressed side casing will be 9" long x 5/8". |
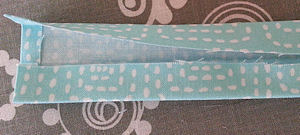 Create Side Casings: Cut two side casings, each measuring 9.5" long x 2.5" high. I used my outer purse fabric - same as the end tab.
|
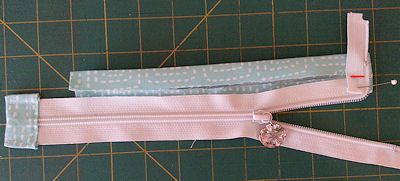
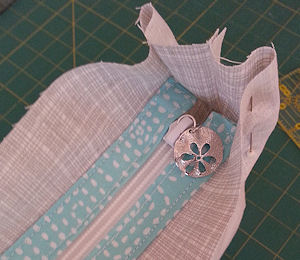
Place the casing around the zipper so that " is between the tab and the casing. Bend the zipper end around into the casing. Mark the place where it hits the center fold. This marks the excess of the zipper that must be cut off.
|
|
|
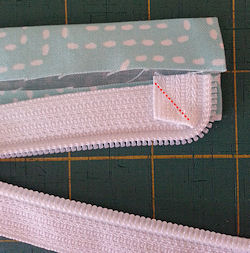 Cut off the excess zipper. Remove the casing. Stitch through the layers of the curved end of the zipper so that the curve is held in place (stitching zipper only). Be sure that the zipper ends are of equal length. The photo shows the curved end stitching of the first side enhanced in red. The zipper is loose inside the casing. The casing is NOT stitched to the zipper at this point.
Repeat with the opposite zipper side.
Cut off the excess zipper. Remove the casing. Stitch through the layers of the curved end of the zipper so that the curve is held in place (stitching zipper only). Be sure that the zipper ends are of equal length. The photo shows the curved end stitching of the first side enhanced in red. The zipper is loose inside the casing. The casing is NOT stitched to the zipper at this point.
Repeat with the opposite zipper side.

|
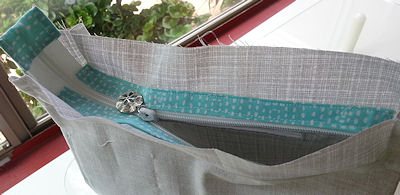
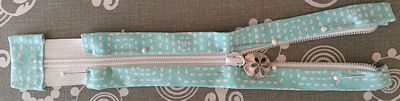
Pin the casings to the zipper. Hand baste in place. Top stitch in place, using a zipper foot. Stitch the ends of the casings, and along the coil side. The top zipper piece is now complete
|
Attach Purse Top Zipper To Lining
|
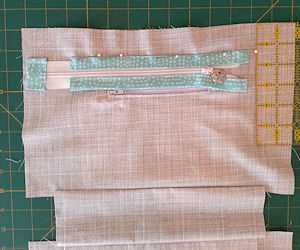 The purse top zipper piece is attached to the right side of the lining. Center the zipper piece (only the casing - ignore the tab and zipper that extend beyond the casing), 1.25" from the top of the lining edge. Pin in place. Stitch in place, using 1/8" allowance. Stitch only the outside edge of the casing. Do not stitch any other side.
|
Pin the casing to the opposite side, 1.25" from the top of the lining. Stitch into place. |
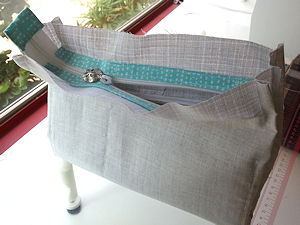
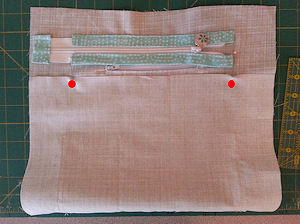 Fold the bottom edge of the lining UP so you can see where to pin the zipper piece to the opposite side of the lining. Be sure the side edges of the lining are aligned. Mark the fabric with fabric marker or pins. I enhanced the markings in red. It's extremely important that the zipper piece be pinned in the same location on each lining side. If it is closer to one end on one side than it is on the other side, the purse will be pulled out of shape.
|
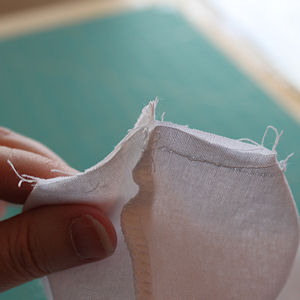
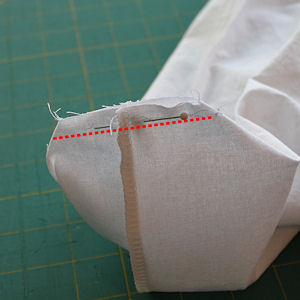
Stitch the raw edges together at the bottom of the bag to create mitered corners on each end of the bag bottom. Pull apart the layers and line up the seams so one is on top of the other. Line up the top cut edges. Pin layers together. Stitch layers. The stitch line is enhanced in red in the image below. This creates the mitered corner. Repeat on all four corners. NOTE: the photos below were taken of a project that did not have seams for the bottom piece. You will need to fold the seams toward the bottom piece before you make the miter line of stitching. |
|
|
|
|
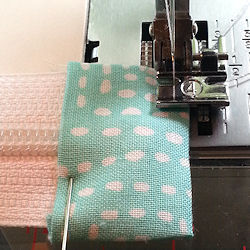
 Make Pleats: Because we mitered the bottom corners, the bag length was reduced from 13" to 10". The top of the bag still wants to fall out wider. This would mean things could fall out of the ends of the opening beyond the zipper. We want the purse to be able to be fuller through the middle, so this problem is solved by adding pleats. I made two 1/2" pleats, each 2" long, on each end of my bag opening. I stitched the pleat line even with the end of the zipper casing. Your pleats might have to be a slightly different size. The important thing is that you use up the extra space at the top of the purse. The purse ends should be up snug against the ends of the zipper casing. The zipper tab will extend beyond the purse opening. Some people like it to show; others tuck it down into the purse.
|
Continue to page 5 for directions for purse front with cell phone pocket |
 That's it! The lining is now finished. If you did all steps, you have a zippered inside pocket, two open pockets, a top opening zipper, and 4 pleats. The exterior of the purse is actually much simpler.
|
Page 4: top zipper |
Quick Reference |
Learn To Paint!free video tutorialsVisit my youtube channel. Free videos with step by step instructions. Paint beautiful paintings for your home. |

Please ShareI rely on advertising to keep my site free. Please share with friends. |
Privacy Policy & Terms Of UseBy using our website, you expressly consent to our Privacy Policy and Terms & Conditions. All Patterns, images and instructions are copyright protected. |