|
|
| HOME SEW CRAFTS DECOR SHOP |
|
LETTER APPLIQUE PILLOW
|
| lessons holiday patterns sewing patterns |

|
-> sewing patterns -> pillows
|
Envelope Back OpeningPage 1 of 2Designer: Christina Sherrod Also see Cushion Cover Patterns |
|
Page 1: Cut fabric / create letter appliques |
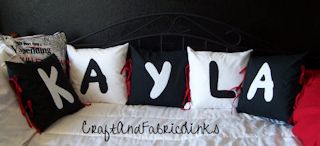
Custom Pillow With Padded Letter AppliquesThe letter appliques stand out because they are padded with fusible fleece. The envelope back opening allows easy removal of pillow. No zippers or buttons. |
|
Create custom pillows that spell out a name, or a holiday greeting, or a favorite word. These easy to make pillows really stand out in black and white, with bright red ties. Choose contrasting colors or your choice. My pattern creates a 16" pillow. Simply change the fabric dimensions and letter size to create the pillow of your choice. This pattern can also be used to create a 14" quilt block. |
Pillow SizeMy pattern creates a 16" square pillow. The letter appliques are approximately 6.5" wide x 8.5" tall. |
Supplies Per Pillow16" pillow form
Fabric
3" tie fabric
7" x 9" piece of letter fabric Fusible Web 7" x 9" piece Fusible Fleece 7" x 9" piece Letter Pattern (see below)
Other
Note: all seams are 1/4 inch. Always iron between steps. |
DirectionsCut Pillow Fabric
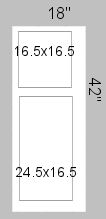
Cut one 24.5" x 16.5" piece of fabric for the pillow back. Repeat for number of pillows you are making. |
Create Letter Patterns (or use mine)
Google offers free fonts to download. Many digital art programs and apps offer interesting fonts as well. |
|
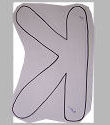
Or, you can download my letters, available in pdf format. For instructions on downloading pdf files, Applique Letters A-J Applique Letters K-Z Your letters should be approximately 6.5" wide x 8.5" tall. I marked off a 6.5" x 8" area on a piece of paper and drew letters large enough to fill this space, using our pattern as a guide. You can also use a copy machine to enlarge our letters. Need a different size? Copy at more or less than 100 percent, or print the pdf file at more or less than 100 percent. |
Create Letter Applique
Cut a 7" x 9" piece of each of the following:
Do this for each letter needed. Follow the directions on the fusible web to fuse the web to the wrong side of your letter fabric. If you are using Wonder Under or Heat N Bond (carried in our store), lay down your letter fabric, wrong side up. Place the fusible web over the fabric, paper side up. Iron over the paper side to fuse the web to the fabric. Place the fusible fleece down, right side up (adhesive side is slightly rougher and is the wrong side). Peel the paper off the wrong side of your letter fabric. Place your fabric right side up on top of your fusible fleece. Iron over your fabric, fusing the wrong side of your letter fabric to the right side of the fleece. NOTE: our letters are backwards so they can be traced to fusible web in other projects. For this project, urn the letter pattern over and hold it up to a window. The letters will show through the paper. Trace over the letters (they will not be backwards on your traced side). Place your pattern over the "letter sandwich" on the right side of the fabric and cut out your letter. Set aside. Repeat for each letter. |
|
Page 1: Cut fabric / create letter appliques |
Quick Reference |
Learn To Paint!free video tutorialsVisit my youtube channel. Free videos with step by step instructions. Paint beautiful paintings for your home. |
Please ShareI rely on advertising to keep my site free. Please share with friends. |
Privacy Policy & Terms Of UseBy using our website, you expressly consent to our Privacy Policy and Terms & Conditions. All Patterns, images and instructions are copyright protected. |


 Cut one 16.5" x 16.5" piece of fabric for the pillow front.
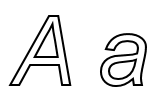
 To create your own FREE alphabet for applique, use any software you have that allows you to create interesting letters.
Good sources for letters are coloring books and embroidery transfers. The letters at the right were created using Paint Shop Pro.

